

Hey there, friend!
Ever feel like your back is screaming after a long day at the desk? Or maybe your shoulders are so tight they’d rather audition as stone statues? Trust me, I’ve been there too. That’s exactly why yoga can be a game-changer — especially if you’re a beginner looking for simple self-care that actually works.
Yoga isn’t some fancy performance for bendy people on Instagram. Nope, it’s a down-to-earth, feel-good practice that helps you relax, stretch out those stiff muscles, and give your mind a mini-vacation. Whether you live in New York, Toronto, or a small Indian town where aunties gossip over chai (like mine do!), yoga can easily fit into your daily routine at home.
I’m Amit Sharma, by the way — a Yoga Trainer and Therapist from India. I grew up in a family where yoga was as normal as drinking masala chai. After studying Yoga & Naturopathy and getting my Master’s in Yoga Therapy, I made it my mission to help folks like you bring balance and calm into everyday life through easy yoga routines.
In this friendly guide, I’ll walk you through the top 10 beginner yoga poses, with step-by-step instructions anyone can follow — even if your flexibility right now is about the same as an office chair. These poses are perfect for absolute newbies, and you don’t even need to leave your living room.
So grab a mat, put on your comfiest clothes, and let’s get started. You’ll find it surprisingly fun — and your body will say a big thank you by the end. Ready? Let’s dive in together!
Why Start Yoga?
So, why should you even bother rolling out a mat and twisting yourself into shapes with weird names? Well, let me tell you — yoga is like hitting a refresh button for your body and mind.
For starters, yoga is amazing for stress relief. You know those days when your boss is yelling, the traffic is nuts, and your brain feels like a pressure cooker? A few gentle stretches and mindful breaths can calm things down in ways you wouldn’t believe. Yoga gives your mind a pause — kind of like switching off your phone for a while to stop all those annoying notifications.
Physically, yoga helps you build strength, improve flexibility, and balance your posture. And no, you don’t have to be a gymnast! I’ve seen folks in their 50s who couldn’t touch their toes when they started, but after a few weeks, they could tie their shoelaces without cursing. Trust me, your body can adapt beautifully.
A lot of beginners worry — “I’m too old!” or “I’m too stiff!” Honestly, these worries are so common, they’re practically part of the yoga journey. But here’s the truth: yoga meets you where you are. You can start with simple poses, even on your bedroom floor, without buying fancy props or outfits.
Yoga is for everyone — whether you’re 25 and chasing a promotion, or 55 and dealing with knee creaks louder than your ceiling fan. All you need is a small corner at home, a little patience, and the will to show up for yourself.
So, take a deep breath, and remember — it’s not about being perfect, it’s about feeling better, day by day.
Getting Ready: Tips for Beginners
Alright, let’s get you set up. Before you hop into your first downward dog, a bit of prep goes a long way — trust me, you don’t want to slip and land like a dropped chapati!
First things first — find a cozy spot at home. You don’t need a big studio or incense everywhere (unless you like that vibe). Just clear a quiet corner with enough space to stretch your arms and legs freely. Even your living room works if you shove aside the coffee table for a bit.
Next, grab a yoga mat. A basic, non-slippery mat is fine — no need to splurge on those fancy designer ones you see on Instagram. If you’re in India, even the local market near your house will have affordable mats. I started on a cheap one from a street shop, and it worked perfectly.
Wear something comfortable. Think stretchy, breathable clothes — the ones you’d happily binge-watch Netflix in. Tight jeans? Big no.
One more thing — try to practice barefoot. It helps you grip the mat better, and you’ll feel more connected to the ground.
Now, let’s talk about warm-ups. A gentle warm-up is like telling your body, “Hey, we’re about to do something awesome.” Start with a few easy neck rolls, shoulder circles, and ankle rotations. It wakes up those sleepy joints and avoids sudden cramps mid-pose.
Most importantly, listen to your body. Don’t force your knees to twist like an Instagram reel. Yoga is a journey, not a wrestling match. Go easy, move slowly, and if something feels painful (not just a stretch, but actual pain), please stop.
And a quick pep talk — be consistent. Even ten minutes a day is better than doing nothing for weeks. Yoga works like watering a plant; a little every day helps you bloom beautifully over time.
Alright — comfy mat, check. Comfy clothes, check. Quiet corner, check. You’re ready to go!
How to Use This Guide
Okay, friend — you’re all set with your mat, your comfy clothes, and that excited sparkle in your eye. So how exactly do you follow this guide?
Simple! Think of me as your yoga buddy, showing you how to move one step at a time. Each pose in this guide comes with:
✅ A short, friendly explanation
✅ Step-by-step instructions you can actually follow
✅ Tips and simple fixes if you get stuck
This guide is for absolute beginners, so there’s zero pressure to look perfect or nail every pose in one go. Nobody expects you to fold up like a paper dosa overnight.
Go at your own pace. Try one pose a day if you like, or follow along with all of them in one easy flow. Feel free to revisit this guide anytime — save it, bookmark it, whatever works for you.
Remember, yoga isn’t a competition. It’s about feeling good in your body and mind.
Sound good? Then roll out that mat — we’re about to dive into the top 10 beginner yoga poses, step by step!
Top 10 Yoga Poses for Beginners: Step-by-Step Guide
1. What is Mountain Pose (Tadasana), and how do I do it?
Mountain Pose is basically standing — but with intention. Sounds funny, right? But trust me, it builds great posture and balance, like laying a strong foundation for all other poses.
Benefits
- Improves posture
- Grounds your mind
- Builds awareness
How to do it step by step:
- Stand with your feet together or hip-width apart.
- Spread your toes gently, press them down evenly.
- Lift your kneecaps slightly, engaging your thighs.
- Roll your shoulders back, arms relaxed by your sides.
- Lengthen your spine, imagining a string gently pulling your head upward.
- Breathe slowly and deeply, feeling steady like a mountain.
Beginner tips:
- Avoid locking your knees.
- If balancing feels tricky, stand near a wall for support.
I remember teaching this to my cousin in India who thought, “Yaar, this is just standing!” — until he felt the subtle strength in his legs. That’s the magic!
2. Why try Downward-Facing Dog (Adho Mukha Svanasana)?
Downward Dog is like the poster child of yoga poses. Great for stretching your back, shoulders, and hamstrings — perfect after sitting all day.
Benefits
- Stretches the spine
- Strengthens arms and shoulders
- Energizes your whole body
How to do it step by step:
- Start on your hands and knees, like you’re going to crawl.
- Tuck your toes under, lift your hips up and back.
- Try to straighten your legs, but keep a soft bend if needed.
- Let your head relax, ears between your arms.
- Press your hands firmly into the mat, shoulders away from your ears.
- Take slow, deep breaths here.
Beginner tips:
- Bend your knees if your hamstrings feel super tight.
- Focus on a straight spine more than straight legs.
Even after years of yoga, I still love this pose. It feels like hitting the “refresh” button for your entire body.
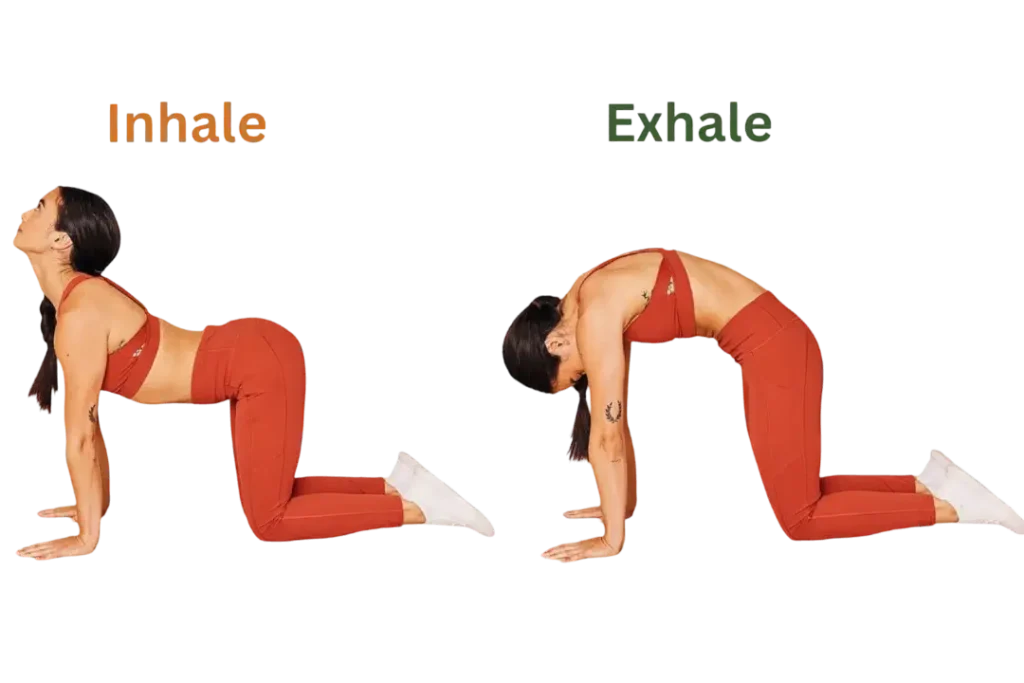
3. What’s the deal with Cat-Cow Pose (Marjaryasana/Bitilasana)?
Cat-Cow is a super gentle warm-up — a great way to loosen up a stiff spine, especially if you sit at a desk or drive a lot.
Benefits
- Increases spinal flexibility
- Massages the organs
- Calms the mind
How to do it step by step:
- Start on your hands and knees, hands under shoulders, knees under hips.
- As you inhale, drop your belly, lift your head and tailbone — this is Cow.
- As you exhale, round your spine like a stretching cat, tucking your chin in.
- Keep moving slowly with your breath — inhale Cow, exhale Cat.
- Repeat 5–10 times, nice and easy.
Beginner tips:
- Keep your movements gentle.
- Match each breath to each movement.
I often share this flow with beginners who complain about back pain from long computer hours. Works like a charm!
4. Why practice Child’s Pose (Balasana)?
Child’s Pose is the ultimate “ahhh” yoga pose. Think of it like a reset button when you feel tired or overwhelmed.
Benefits
- Calms the nervous system
- Gently stretches hips and back
- Relieves stress
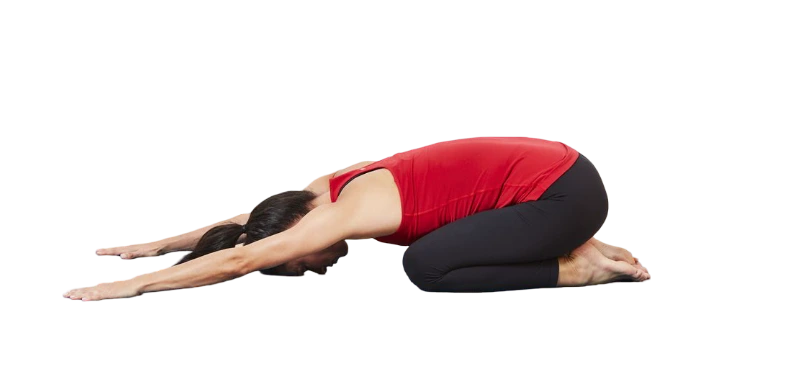
How to do it step by step:
- Kneel on the floor, big toes touching, knees apart.
- Sit your hips back onto your heels.
- Stretch your arms forward and rest your forehead on the mat.
- Breathe slowly, relaxing your entire body.
- Stay here for as long as you like.
Beginner tips:
- Place a cushion under your hips if they don’t reach your heels.
- Rest your arms alongside your body if your shoulders feel tight.
Whenever I feel stressed (like after fighting with my bank’s customer care in India!), Child’s Pose brings me instant peace.
5. How to do Cobra Pose (Bhujangasana) safely?
Cobra is amazing for opening your chest and countering that “hunched-over” posture from working on laptops or scrolling endlessly.
Benefits
- Strengthens back muscles
- Improves spinal flexibility
- Opens the chest

How to do it step by step:
- Lie on your stomach, legs extended back.
- Place hands under your shoulders, elbows close to your ribs.
- Inhale and gently lift your chest, pressing your palms down.
- Keep your elbows slightly bent.
- Lengthen your neck, gaze forward or slightly upward.
- Exhale and release back down.
Beginner tips:
- Don’t force your back; lift only as far as feels comfy.
- Keep your shoulders away from your ears.
My students love this pose after long hours hunched over desks — it feels like unrolling a crumpled bedsheet!
6. What makes Warrior I (Virabhadrasana I) powerful?
Warrior I builds strength, confidence, and makes you feel, well, a bit heroic!
Benefits
- Strengthens legs and arms
- Opens the chest
- Improves balance
How to do it step by step:
- Stand tall, then step your left foot back about three feet.
- Turn the back foot slightly outward.
- Bend your right knee over your ankle.
- Raise your arms overhead, palms facing each other.
- Square your hips forward.
- Hold for a few breaths, then switch sides.
Beginner tips:
- Shorten your stance if you feel wobbly.
- Keep your back heel grounded.
Once, a student told me, “I feel like a Bollywood hero in this pose!” — exactly the attitude you need.
7. Why include Warrior II (Virabhadrasana II) in your practice?
Warrior II is a great follow-up to Warrior I. It works your legs while stretching your upper body.
Benefits
- Strengthens legs and arms
- Improves focus
- Opens hips
How to do it step by step:
- From standing, step your left foot back wide.
- Turn the back foot out to 90 degrees.
- Bend your right knee over the ankle.
- Stretch your arms out to the sides, parallel to the floor.
- Gaze over your front hand.
- Breathe deeply here.
Beginner tips:
- Keep shoulders relaxed.
- Avoid leaning forward — stay centered.
I sometimes imagine I’m protecting my house from neighborhood monkeys in this pose — powerful and focused!
8. What is Tree Pose (Vrikshasana), and how do I balance in it?
Tree Pose helps improve your balance and focus, and you’ll look kind of cool doing it!
Benefits
- Builds balance
- Strengthens legs
- Improves concentration
How to do it step by step:
- Stand tall with feet together.
- Shift weight onto your left foot.
- Place the right foot on your left inner thigh or calf (not the knee).
- Bring hands to prayer position at your chest, or overhead.
- Breathe steadily, and switch sides after a few breaths.
Beginner tips:
- Use a wall to steady yourself.
- Keep your eyes fixed on a still point to help balance.
One of my uncles in India loves showing off Tree Pose to guests — trust me, balancing makes you feel accomplished!
9. How does Bridge Pose (Setu Bandhasana) help beginners?
Bridge Pose is a gentle backbend that can stretch the front of your body and strengthen your back.
Benefits
- Opens the chest
- Strengthens lower back and glutes
- Relieves mild back tension
How to do it step by step:
- Lie on your back, knees bent, feet flat on the mat.
- Place arms alongside your body, palms down.
- Press feet into the mat and lift your hips.
- Roll shoulders under for more lift if comfy.
- Hold for a few breaths, then lower down slowly.
Beginner tips:
- Keep your feet parallel.
- Avoid over-arching your neck.
This pose always reminds me of how my cousins used to build blanket forts — only this time, your body is the bridge!
10. Know about Seated Forward Bend (Paschimottanasana)?
Seated Forward Bend gives you a lovely hamstring stretch and a quiet moment to slow down.
Benefits
- Stretches the spine and hamstrings
- Calms the mind
- Improves digestion
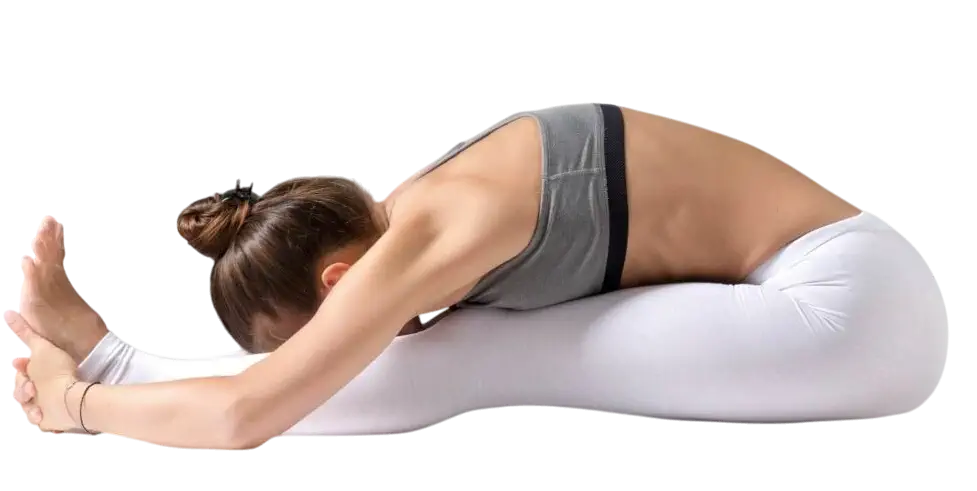
How to do it step by step:
- Sit tall with your legs extended forward.
- Inhale, raise your arms up.
- Exhale, fold forward from the hips, reaching toward your toes.
- Keep your back as long as possible.
- Hold the pose gently, breathing slowly.
Beginner tips:
- Bend knees a bit if hamstrings are tight.
- Use a yoga strap around your feet if you can’t reach.
I tell my students to imagine reaching for their favorite sweet — patience is key, or you’ll just fall forward!
Easy Yoga Routine for Beginners: Step-by-Step Sequence
So you’ve learned the top 10 beginner yoga poses — but you might be wondering, “How do I put them together?” Good question, friend!
Here’s a gentle daily sequence you can follow, taking about 15–20 minutes. You can do it in your living room, bedroom, or even on a rooftop (just mind the pigeons if you’re in India, ha!).
Step-by-step beginner yoga sequence:
1️⃣ Mountain Pose (Tadasana) — Stand tall for 5 deep breaths. Feel steady and grounded.
2️⃣ Warrior I (Virabhadrasana I) — Hold on the right side for 5 breaths, then switch to the left.
3️⃣ Warrior II (Virabhadrasana II) — Stay on each side for 5 breaths, enjoying the powerful stance.
4️⃣ Tree Pose (Vrikshasana) — Balance on each leg for about 5 breaths. If you wobble, smile — that’s part of the fun!
5️⃣ Downward-Facing Dog (Adho Mukha Svanasana) — Hold for 5–7 breaths, stretching out your spine.
6️⃣ Cat-Cow Pose (Marjaryasana/Bitilasana) — Flow gently with your breath for 5–8 rounds.
7️⃣ Cobra Pose (Bhujangasana) — Lift and hold for 5 deep breaths. Feel your chest open up.
8️⃣ Child’s Pose (Balasana) — Rest and breathe deeply for as long as you like, minimum 5 breaths.
9️⃣ Bridge Pose (Setu Bandhasana) — Hold for 5 breaths, release gently.
🔟 Seated Forward Bend (Paschimottanasana) — End with a soft forward fold, breathing calmly for 5–10 breaths.
Tips for smooth transitions:
- Move slowly between poses.
- Use your breath as a guide — inhale to lengthen, exhale to soften.
- If something feels uncomfortable, skip or modify it.
Timing suggestion:
- Ideally, spend about 1–2 minutes in each pose.
- If you have more time, repeat the sequence or hold poses a bit longer.
Practicing this beginner yoga sequence even three times a week will help you feel calmer, stronger, and more flexible. And hey, no membership fees — just you, your mat, and maybe a bit of background music.
Final Tips and Motivation
Okay, friend, here’s the pep talk you didn’t know you needed!
Starting yoga can feel intimidating, especially when you see super-bendy people on social media twisting like pretzels. Please ignore that. Yoga is about you — your breath, your body, and your peace of mind.
Stay patient. Your hamstrings might feel like steel wires today, but they will loosen up. Your balance might feel shaky at first (I still fall out of Tree Pose on bad days, no shame!). With time, you’ll feel stronger, calmer, and happier.
Remember, yoga is self-care — not a race. Show up for yourself, celebrate the small wins, and don’t sweat the details.
If you ever feel stuck or have questions, leave a comment or connect with other beginners online. You’ll be surprised how many people are on the same journey.
You’ve got this. Roll out that mat, breathe deep, and keep coming back. That’s how the magic happens. 🌟
Conclusion
Look at you! You’ve just learned the basics of 10 awesome yoga poses and even a simple routine to kick-start your practice. 🎉
Yoga for beginners doesn’t have to be complicated. With these easy poses and simple steps, you can build a habit that supports your body and calms your mind — right from your living room floor.
Bookmark this guide, come back to it whenever you like, and remember: progress is progress, no matter how slow.
So… ready to roll out your mat and give it a try? Your future flexible, peaceful self is waiting. 😉
Common Questions from Beginners (FAQ)
1. How often should I practice yoga as a beginner?
Great question! Ideally, aim for about 3 times a week to start building consistency. Even 15–20 minutes is enough. If you feel good, you can gently move toward daily practice. Remember, short and regular is better than one long session once in a blue moon.
2. What if I’m not flexible?
Oh friend, that’s exactly why you should do yoga! Flexibility comes with time. When I started, I could barely touch my knees, let alone my toes. Yoga is designed to help you become more flexible, so don’t stress — bend only as much as you comfortably can.
3. Can I do yoga if I have no experience?
Absolutely. This guide is made for folks with zero experience. Yoga is for every body, no matter your background. Just start slow, follow the steps, and go at your own pace.
4. Do I need special equipment?
Nope! A simple yoga mat is enough. Wear stretchy, comfortable clothes. If you like, keep a small towel and a bottle of water nearby. That’s it — no fancy props needed, unless you want to explore them later.
